is line break, etc. Use the example you've started with to get the feel of how they work, while comparing to the displayed version of the webpage. When you're done, you "ftp" this file and any associated images to "your" web space (usually your default login area at your ISP) and you will be in business. If you name your main page "index.html" it will open automatically if present in any directory. So my main page is
You can always use one of the free HTML editors, or even Word and save something to HTML, but you'll be clueless as to how to fix problems if you don't know the basics. Personally, I don't like all that garbage in my HTML file. If you want to know what I mean by "garbage", just check out most commercial web sites (with "View Source") and you'll be instantly intimidated by the level of complexity of the code. By keeping it simple I have a complete understanding of what's going on, and I never have problems to fix that take more than a few seconds...
If the rest of this page looks like somebody just threw it together from a bunch of pictures, there's probably a good reason for it. Occasionally I throw stuff out here for people, and this is the easiest way to keep from losing it...
For those wondering what size wire to use when wiring their panel, please see the chart below (this chart is also shown at http://www.n56ml.com/tbe/wiresize.html).
B&S GAUGE 22 20 18 16 14 12 10These sizes are based on 0.5 volt drop. Composite and wood/cloth airplanes double distance for ground. Subtract 10% from current capacity for operation at 120F. Make sure your wires can handle the max capacity of the breakers to which they are connected. The whole point of breakers is to protect you from the smoking insulation of overheated wires (not to mention a subsequent fire), not to protect the devices at the end of the line. I sized my breakers to be at least 25% larger than the total of the devices they protect, and the wire the next size larger. My breakers are combination switch/breakers, made by Carlingswitch (see www.pocosales.com), but no longer sell in small quantities like my instrument panel. Newark sells the 5A and 10A version though. Potter Brumfield makes a nice one too (see AS&S catalog for only $13 or so) but it has a cheesy looking translucent orange rocker. The Carlingswitch rockers come in a multitude of configurations and colors, if you can find a supplier that will sell in small quantities. I highly recommend them.milliohms/ft @68F 16.1 10.1 6.4 4.0 2.5 1.6 1.0
max fuse size (Amps, 7' max) 5 7 10 15 20 25 35 max Amps, 15' 2.1 3.3 5.2 8.3 13 20 33 max Amps, 20' 1.6 2.5 3.9 6.2 10 15 25 max Amps, 25' 1.2 2 3 5 8 12 20 max Amps, 30' 1 1.6 2.5 4 6.6 10 16 max Amps, 35' 0.9 1.4 2.2 3.5 5.7 8.9 14 max Amps, 40' .78 1.2 1.9 3.1 5 7.8 12 max Amps, 45' .69 1.1 1.7 2.7 4.4 6.9 11
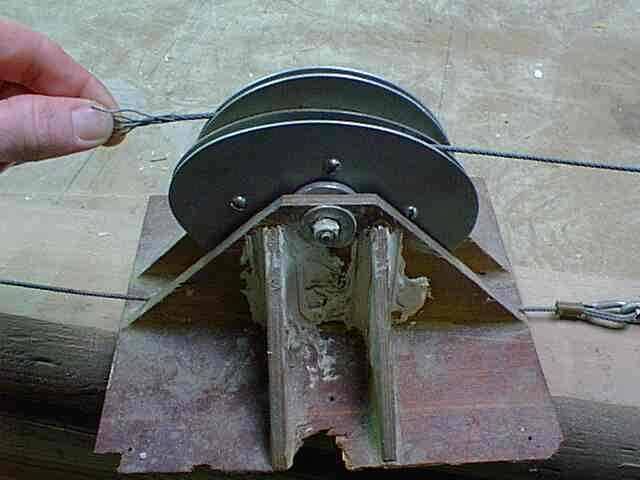
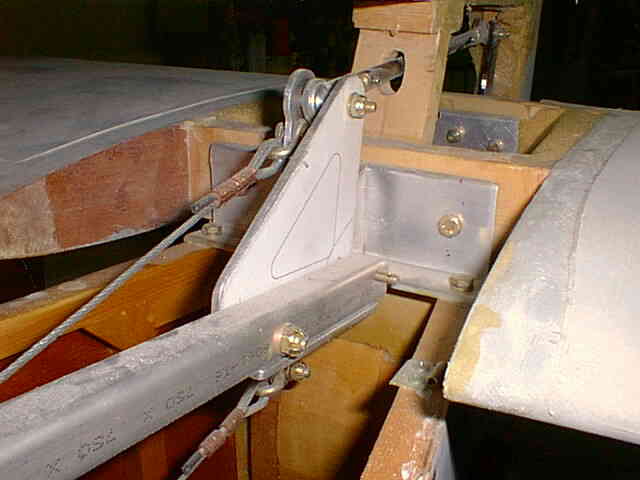
This is the "differential elevator" mechanism from Don Cornwell's KR2. This concept was detailed in the October 89 KR Newsletter by Howard Kaiser. This was located half way between the stick and the elevator, and the cables were pinned into place inside the "pullies". The idea is to connect the round part to the stick cable and the elliptical part to elevator cable, and the elevator doesn't move much with large stick movements and moves more as the stick gets closer to the ends of its travel. I'm not sure that this works, and Lancair's solutions would indicate that this might be exactly backwards, so I'm not sure that I would try it, unless it's easily swapped out for a normal system.
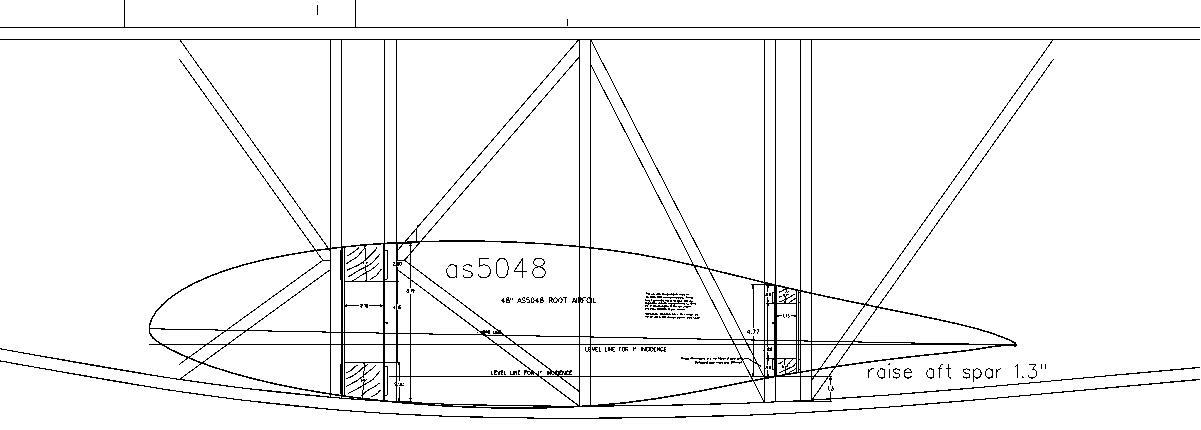
This shows the area included for a wing tank located at the wing root of the RAF48. Use of the AS5048 will get you 20% more fuel in the same area, not to mention a 17% stronger main spar. There's 231 cubic inches in a gallon, so if your stub wings are 24" long, each would hold (24 x 108.6) / 231=11.3 gallons. I think the plans call for tanks in the outboard wings though, which taper a bit. And if you have tri gear, you have the gear leg bracket to dodge, which cuts into fuel tank volume considerably. Maybe the outboard wing is the ticket for tri gear.
My elevator counterweight.
Split flap system for the KR as done on N56ML.
Frise aileron for the KR, again as on my airplane.
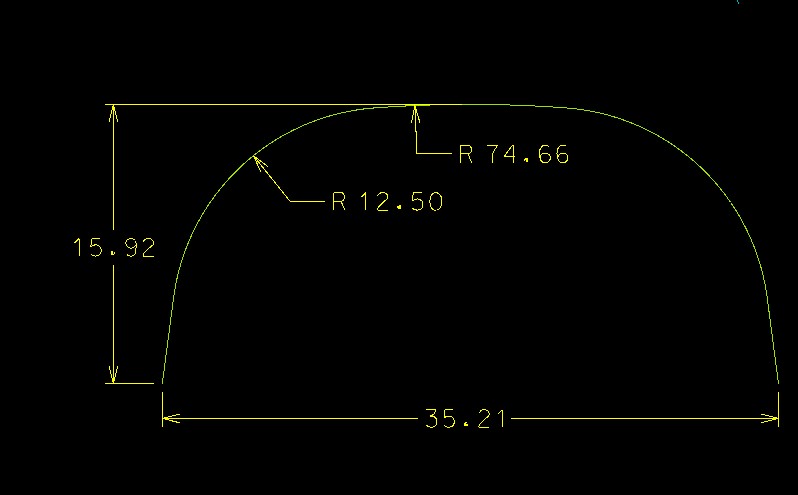
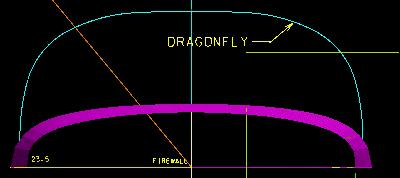
This is the shape of the template that I made for the aft edge of my Dragonfly canopy.
This was a test to see if a "rolled" hinge (rather than extruded) could hold 150 pounds. It did! That's enough to prove to me that 72 inches of this will last far longer than the aileron or wing itself. That's a four inch long hinge. A 72 inch long hinge would carry 2700 pounds, which is more than my car weighs!
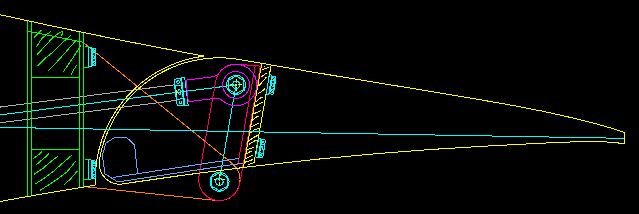
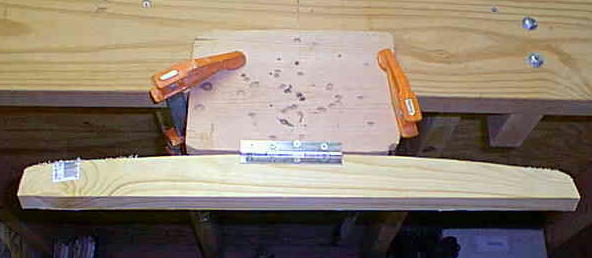
A view of my adjustable horizontal stabilizer, along with the elevator counterbalance. If you're wondering how it's adjustable, right now it's not. The spar is clamped between two angles on each side. If adjustment is required, I'll remove the two bolts on the front side, insert a drill thru the two angles (with sandwiched spar) and slot the spar. My spar is 3" tall, so I can afford a slight elongation. 1/10" will get me .75 degrees of incidence change.
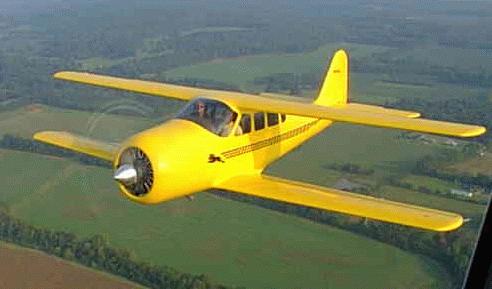
Lionheart, near Moontown airport near Huntsville, AL. This was with a wide angle lense, so you know he was close! I took this out the window of Rick Stroud's Swift, with the window rolled down.
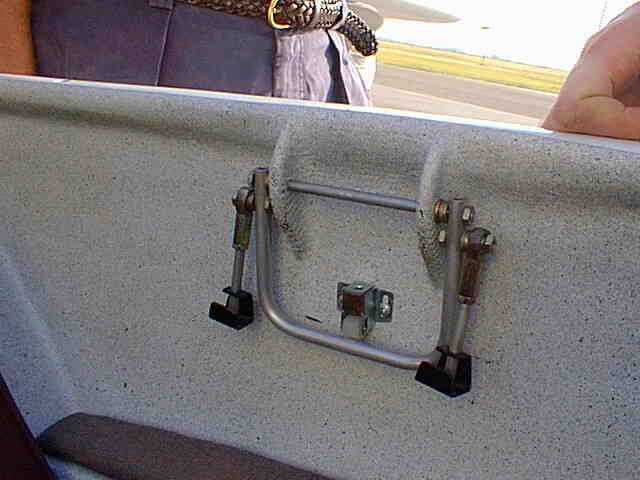
I think this canopy latch was in a Lancair 320 at the Perry Gathering.
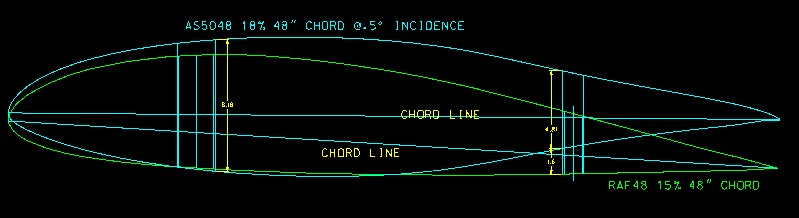
Here's a comparison of the RAF48 and the AS5048, set at .5 degrees of incidence. I think 1 degree is probably a better bet for now.
I think this also appears in one of the KROnline articles, but it never hurts to show it twice.
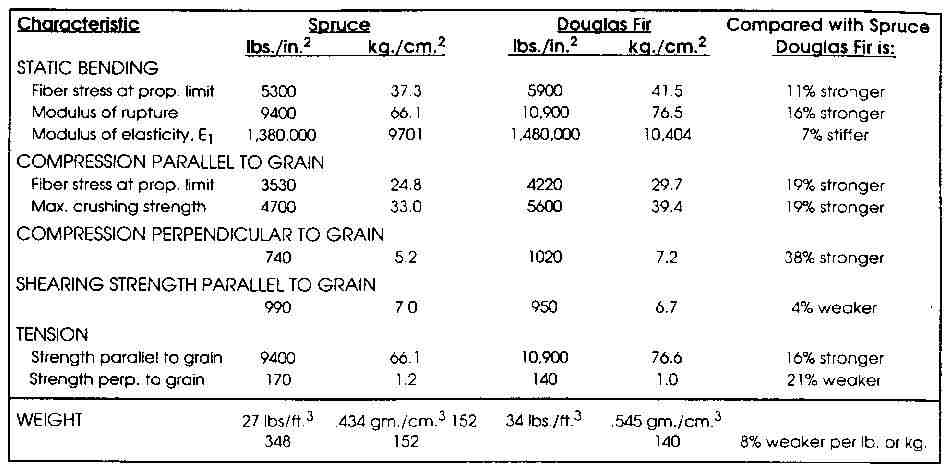
Design data for Spruce and Douglas Fir. What is neglects to mention is the weight penalty that goes with the Doug Fir. And it doesn't mention the number one reason to go with Doug Fir, the PRICE! Be sure to get "aircraft grade", whichever you use.
A simple stick design.
Troy Petteway's original weight and balance sheet.
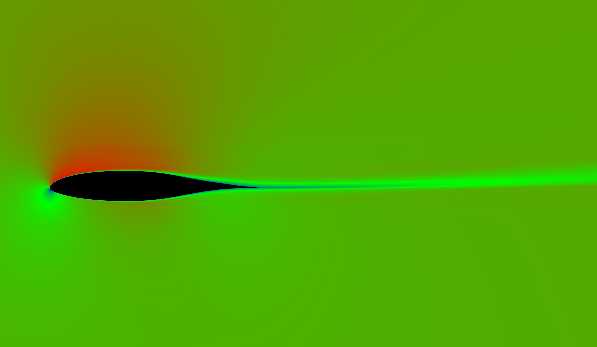
This is an image that Mark Lougheed (who did a stability analysis on the AS5046 wing) created using CFD analysis. It shows the wing at an incidence of 4 degrees and the flow field surrounding it.

Some more of Mark Lougheed's wing CFD work.
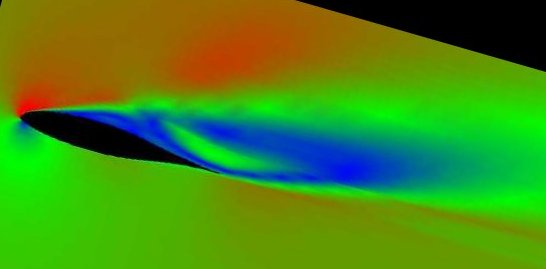
As is this, the new airfoil about to stall at 16 degrees of incidence.
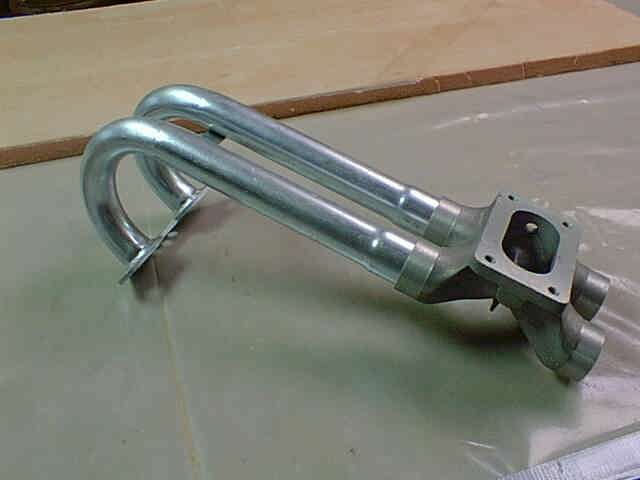
Here's a very light Type 4 intake manifold runner made of thin steel, by Eurorace. The center casting is a little heavier, and the opening is wrong for our application. I think the whole thing was only $85.
Graphic demo of why it would be nice to change the bottom of the fuselage to match the AS5048 wing's aft end.
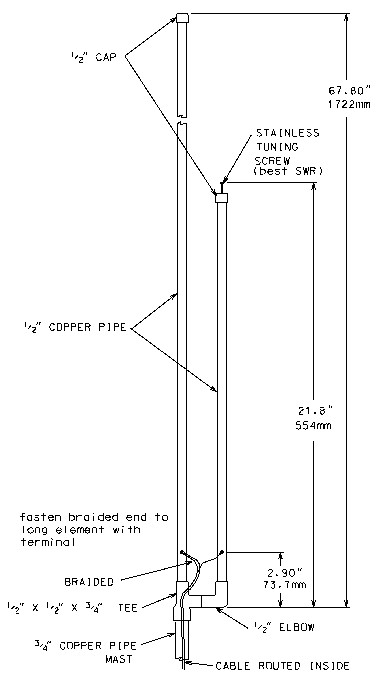
Jim Wier's antenna design, as published in Kitplanes. I built one, and the reception is astounding!
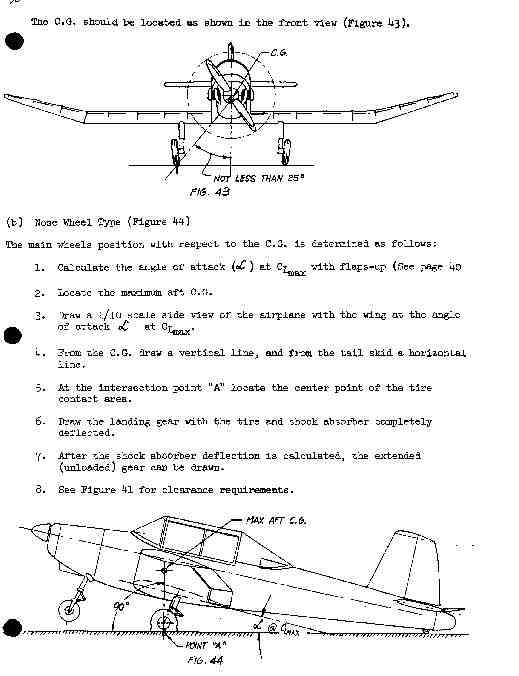
Basic gear design parameters.

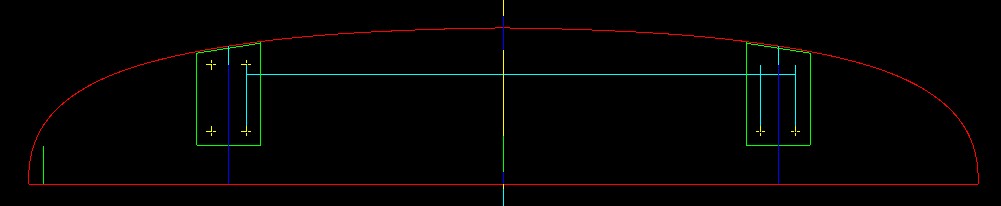
Here's how I built my canopy hinge, modeled around the Beetle (Ghia) hood hinge. The left edge is the firewall, and the green lines are a scale, 1" apart.
View of the hinge brackets from the cockpit.
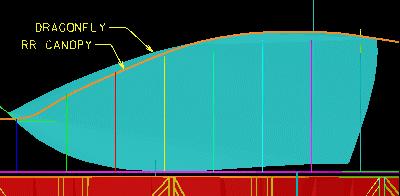
Here's a Dragonfly compared to a KR2S canopy. The Dragonfly is a lot longer too, but lighter because it's thinner.
Front view of the aft edge of the canopy, and aft deck in purple.
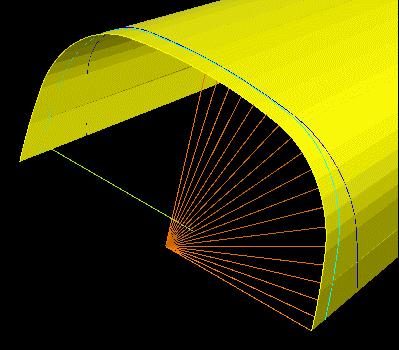
Here's how I defined the aft edge of the canopy to digitize it, using a polar coordinate system.

3D surface of the Dragonfly canopy, which I've since managed to delete, somehow.
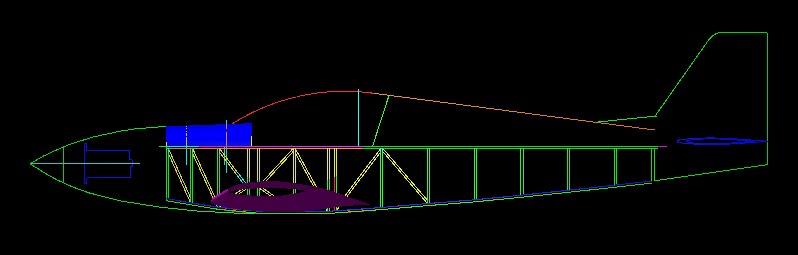
Here's how I plan to do my cowling, somewhat like a missile. I think the engine in this view is a sub-atomic particle accelerator.
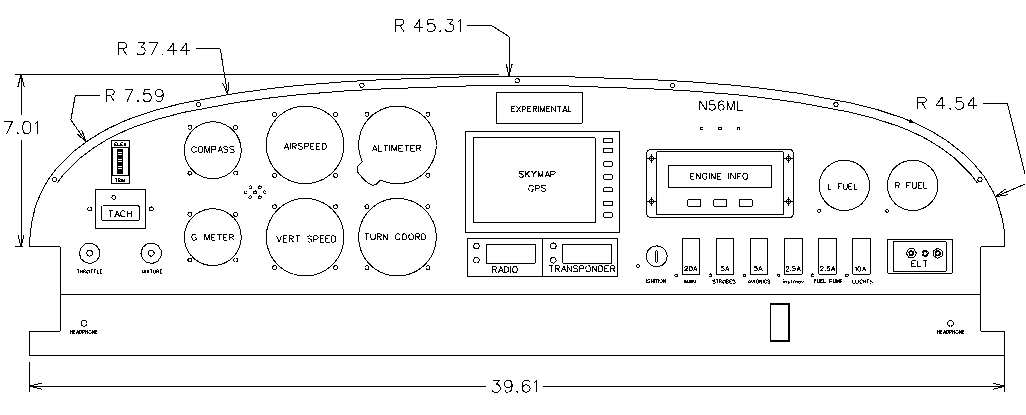
My instrument panel dimensions, which are just about stock. I scaled it from the S drawing package.
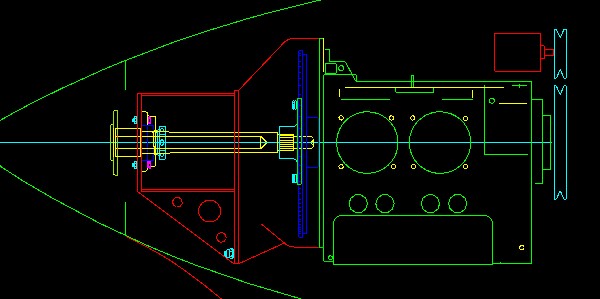
Prop drive shaft that I've since redesigned several times, and relegated to the Type 4 back burner, now that I've discovered the Corvair.
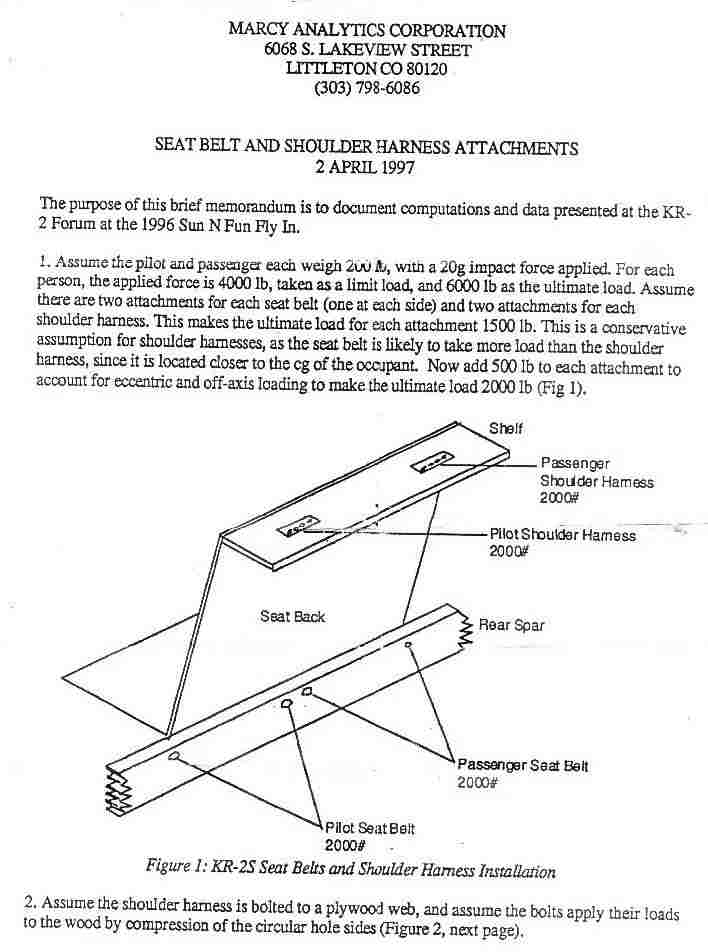
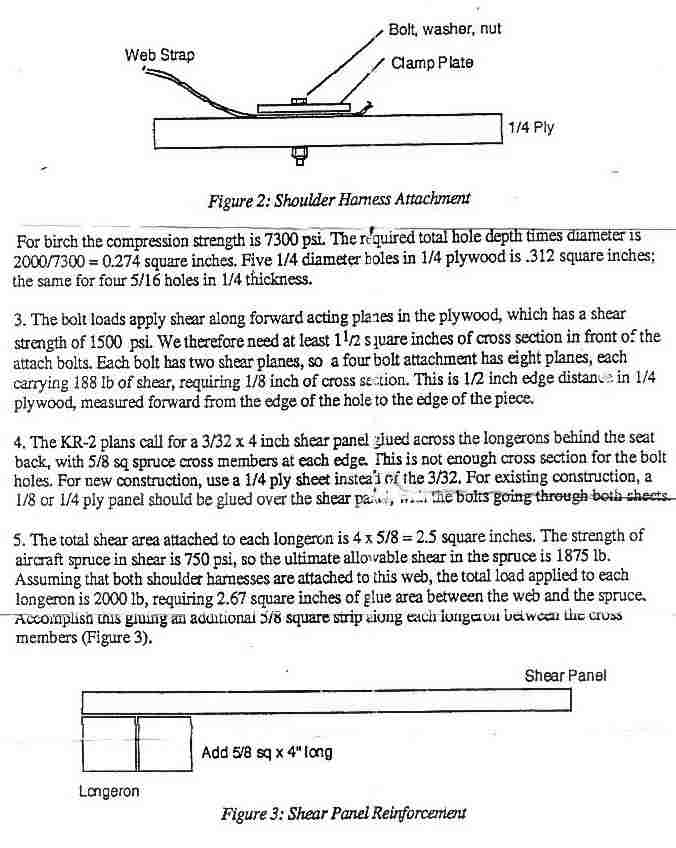
This shoulder belt design is for the KR series, sanctioned by RR.
Thse are the drag L/D plots of the 23012 airfoil. Note the point at which the wing stalls, very abruptly.
The23015 isn't any better, but is used on many spam cans, including the Piper 140.
Engineering data for Aeropoxy.
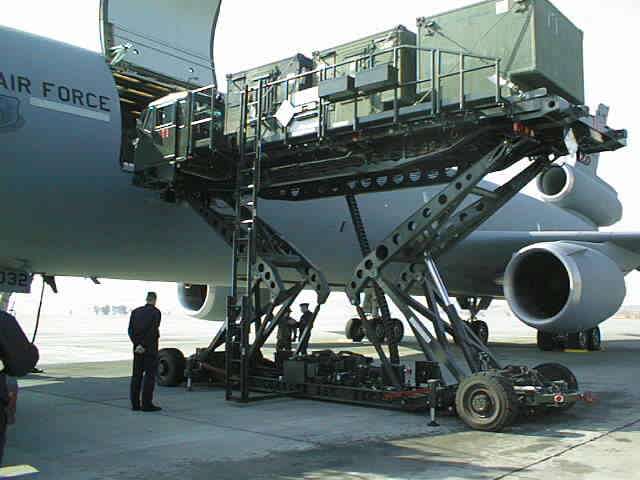
Here's what's kept me so busy for the last 2 years, Teledyne Brown's 25,000 pound aircraft loader, shown during testing at Travis Air Force base.
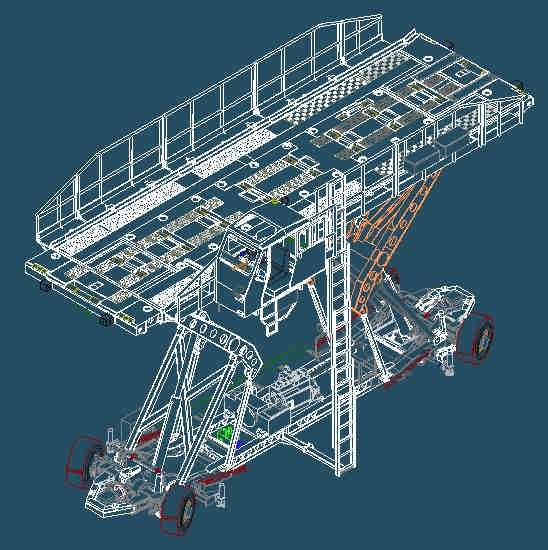
Solid Edge model of the loader. It takes a Gigabyte of RAM just to load it!
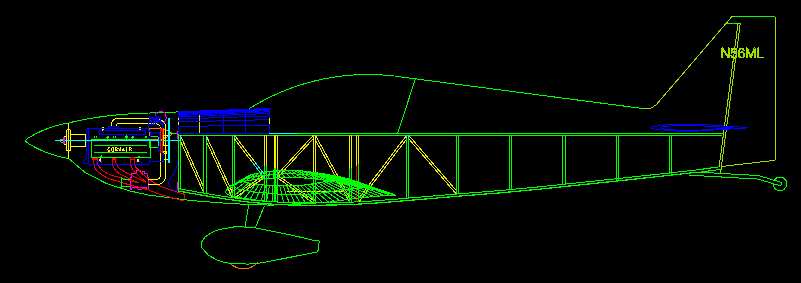
N56ML, with Corvair engine installed.

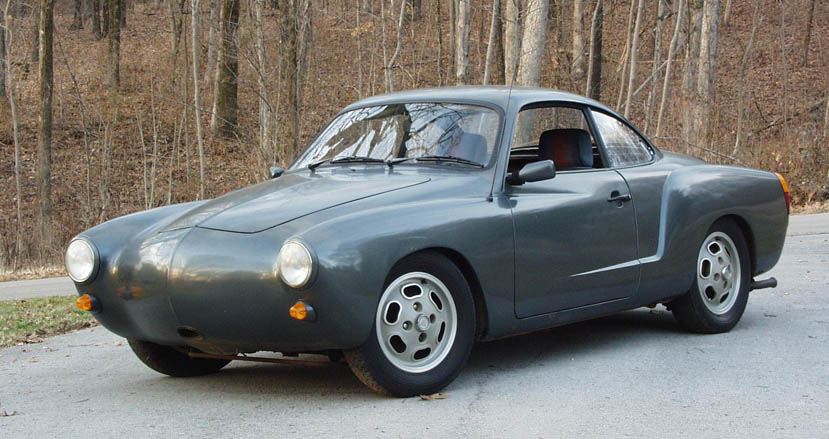
I bought this car new in 1974. Doesn't look too bad for 26 years old does it? It will blow the doors off of a stock 5 liter Mustang, and badly embarass any Porsche that's not lucky enough to have a turbo. I've done everything ever done to this car since it was bought, including the Imron paint job in 1988.
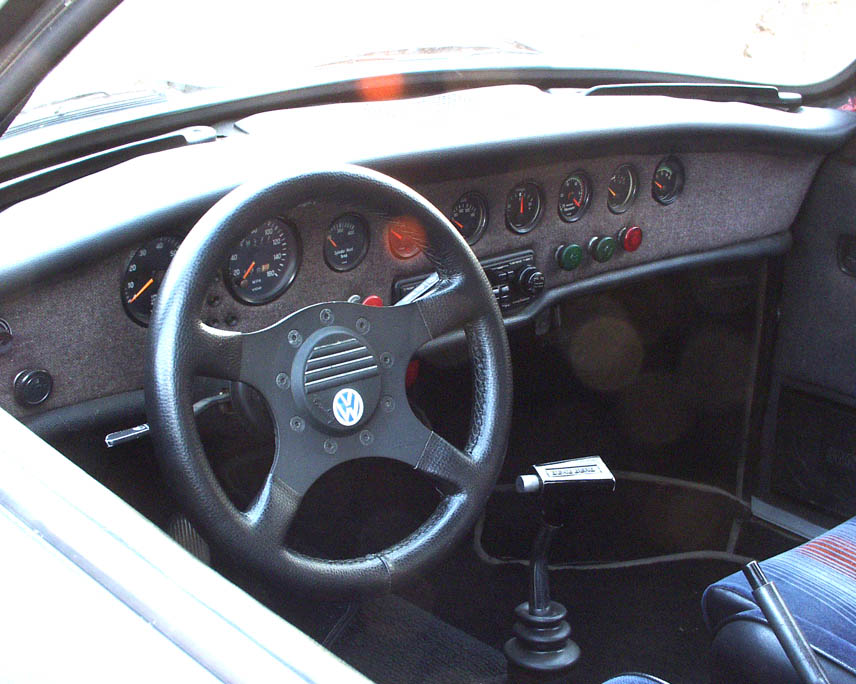
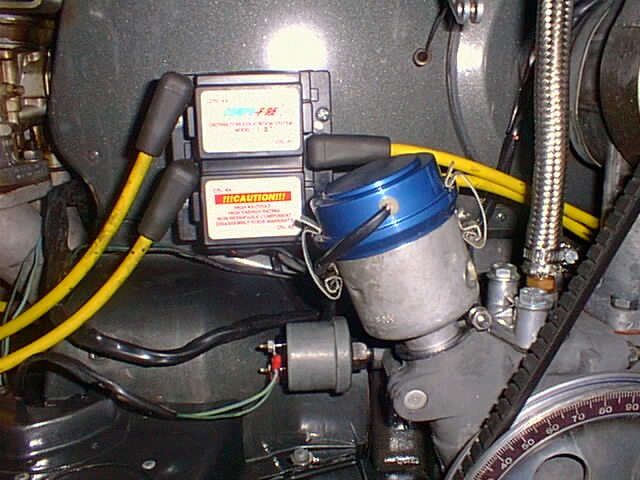
Compufire ignition installed on 009 distributor. Note fan shroud matches the rest of the Karmann Ghia.
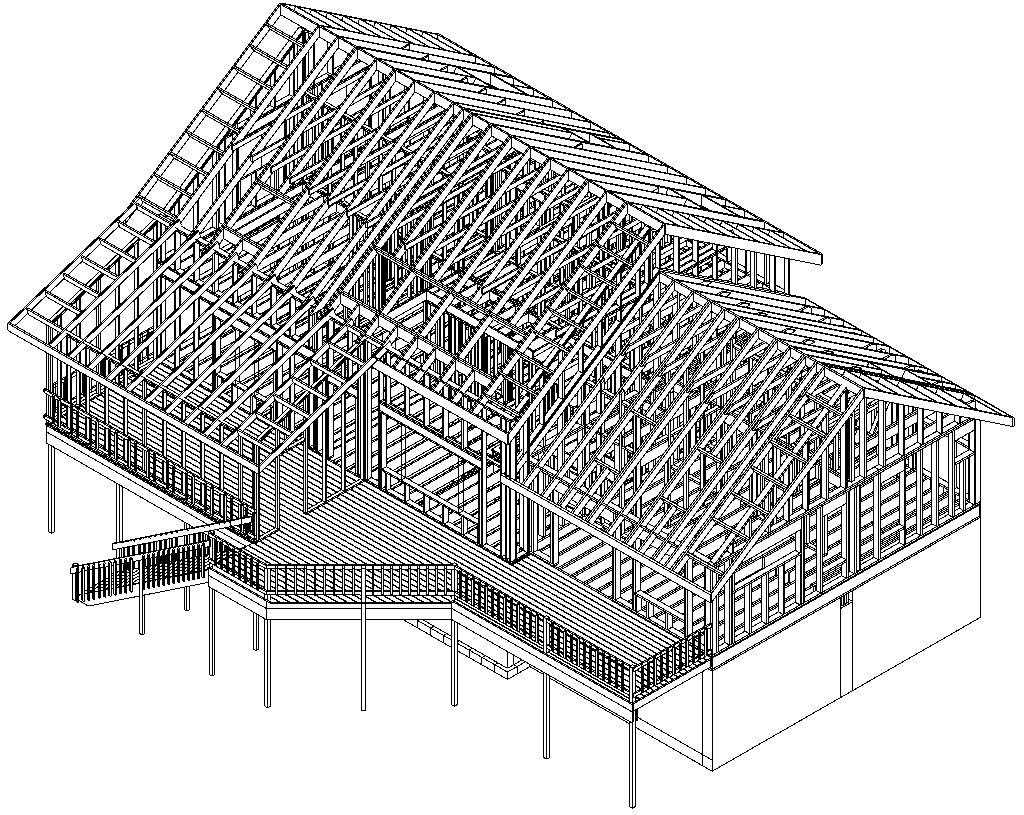
This is a 3D model of the house that my wife and I designed (she did all the CAD work) and built (ourselves!) in 1990. Every board is in place. The plans were created by cutting sections thru the walls and dimensioning them...
This is the beginning of some KRNet messages that I've typed several times and want to hang on to.
The 009 has a total of 8.5 degrees of advance, which after being multifplied by 2 for crank advance is 17 degrees. That means that if you want to run a total advance of 27 degrees (which is about right for an airplane, maybe 28) you'd need to set the timing statically at 10 degrees BTDC (before top dead center), which is typical for cars as well. If you don't have timing marks, you can figure out where to put them by ascertaining where top dead center is (a screwdriver in the spark plug hole for number one, or better yet, a dial indicator) and mark the average of the two places where the piston starts moving again. The best way to do this is with a dial indicator with the head off, pressing on the piston top, and mark TDC on the back of the prop hub or flywheel where you can see it later.
Then you can use an "advancing" timing light (dialed in to 27 degrees) to show the timing mark (dynamically) when the engine is wide open throttle. Watch that prop though! See ~http://www.n56ml.com/1aug98yp.jpg
The problem with the 009 is that the advance is not all "in" until 2700 rpm, which is another good reason to check it dyanamically. Unless you're hitting 2700, your distributor is never advancing all the way.
The Compufire doesn't factor into the equation. It just fires when the "electronic points" tell it to, so all other distributor characteristics are the same. Excellent choice, the Compufire.
My bet is that a lot of engines out there are not living up to their potential because the timing is not set correctly. So easy to do, and so important to power output and engine longevity.
More to come, a little at a time...
Move down to the bottom in 2018 to remind me when I get senile....
Steve's Digicam webpage. Ritzcamera.com is selling it with the lense for $1000. Make sure you don't accidently buy it WITHOUT the lense from somewhere else. You can't buy the lense separate, and it's a bargain at only $100 bucks. This is another "breakthrough" digital SLR camera, using the new CMOS technology. This is a real SLR with twist-to-focus focus and zoom, just like you're probably used to on your old SLR. SLR means "single lens reflex", which means you're actually seeing what the lense sees through the viewfinder, rather than an approximation through a little window. Although this new camera has 3 times the resolution of my old one, the big attraction is the ISO 1600 speed, which is a giant leap over my C-2500L's 100 ISO speed. Now I won't need to carry a tripod every where I go! I'll hand down my C-2500L to my kids so they can hone their photography skills.
Steve's Digicam webpage. Ritzcamera.com is selling it with the lense for $1000. Make sure you don't accidently buy it WITHOUT the lense from somewhere else. You can't buy the lense separate, and it's a bargain at only $100 bucks. This is another "breakthrough" digital SLR camera, using the new CMOS technology. This is a real SLR with twist-to-focus focus and zoom, just like you're probably used to on your old SLR. SLR means "single lens reflex", which means you're actually seeing what the lense sees through the viewfinder, rather than an approximation through a little window. Although this new camera has 3 times the resolution of my old one, the big attraction is the ISO 1600 speed, which is a giant leap over my C-2500L's 100 ISO speed. Now I won't need to carry a tripod every where I go! I'll hand down my C-2500L to my kids so they can hone their photography skills.
All of the images on my web site are saved at 72 dpi, and most are compressed (using Cyberview) down to about 25K for faster downloading. Cyberview displays the image in
two side by side panes. You slide a little slider to the right and watch the file size plummet and the the image degrade slightly, until you get to a level you
can live with and save it. It's amazing how much compression you can do before
there's any real difference in image quality, depending on where you start
from. I have a directory I named "shrinker" that I put all of the output
in, which I then send to my website for inclusion into a web page. That way my original picture files remain uncompressed. I use PaintShopPro (available from http://www.shareware.com last time I checked) to
crop and resize images before I compress them. But it's easier to just shoot them at 540x480 to begin with, so you can at least skip the resizing step and go straight to compression.